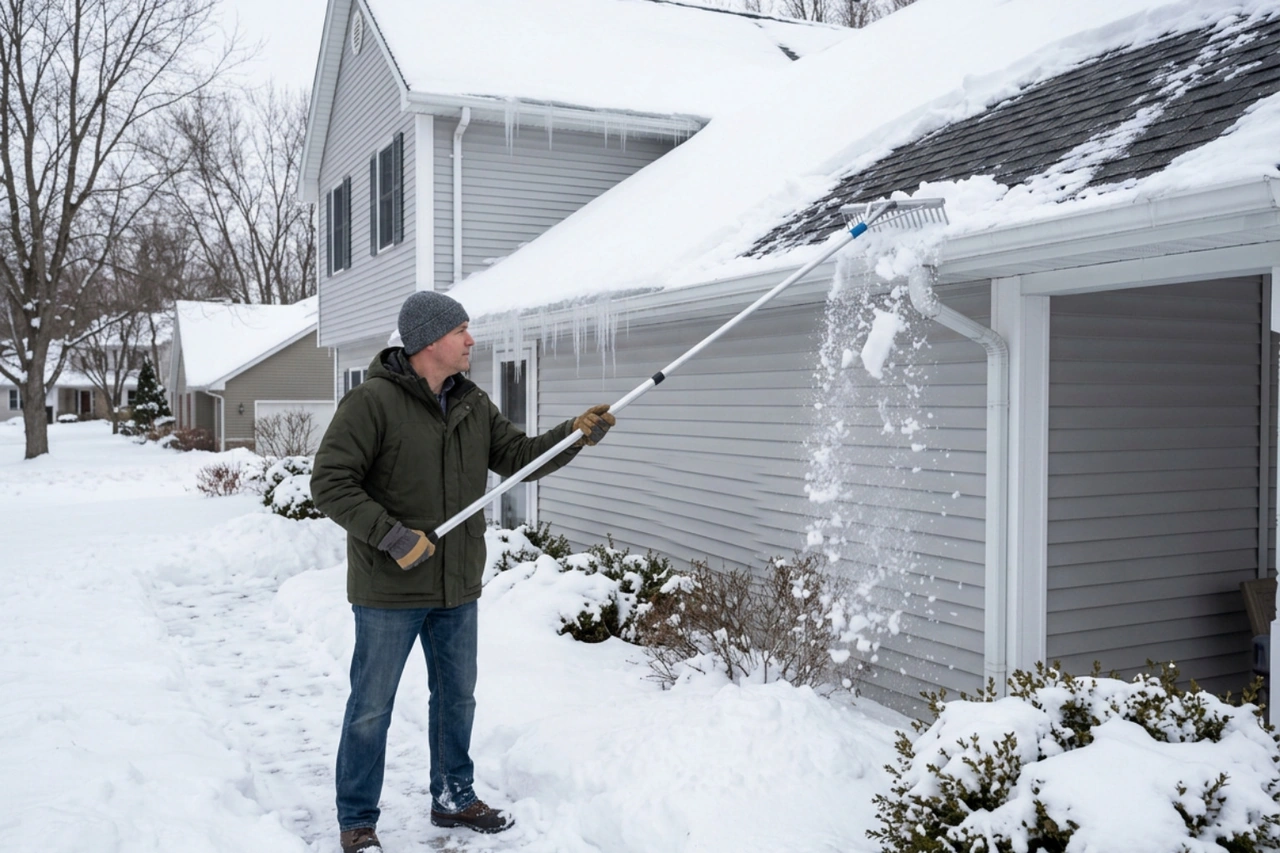
How Do Ice Dams Form and Why Do They Target the Same Spot?
To understand why ice dams keep forming on the exact same spot, it helps to look at the three conditions needed for an ice dam to exist:
- A heavy layer of snow sitting on your roof deck
- Heat escaping from your living space that warms the upper roof deck above 32°F
- Freezing outdoor temperatures that keep the lower eave and gutter overhang below 32°F
When these three factors meet, snow on the upper portion of the roof melts. The water trickles down the roof slope beneath the snow blanket until it reaches the cold overhang at the eaves or soffits. Because that lower overhang sits beyond the exterior wall and receives no home heat, the meltwater refreezes solid. As more water flows down, it hits that ice barrier, pools behind it, and grows thicker.
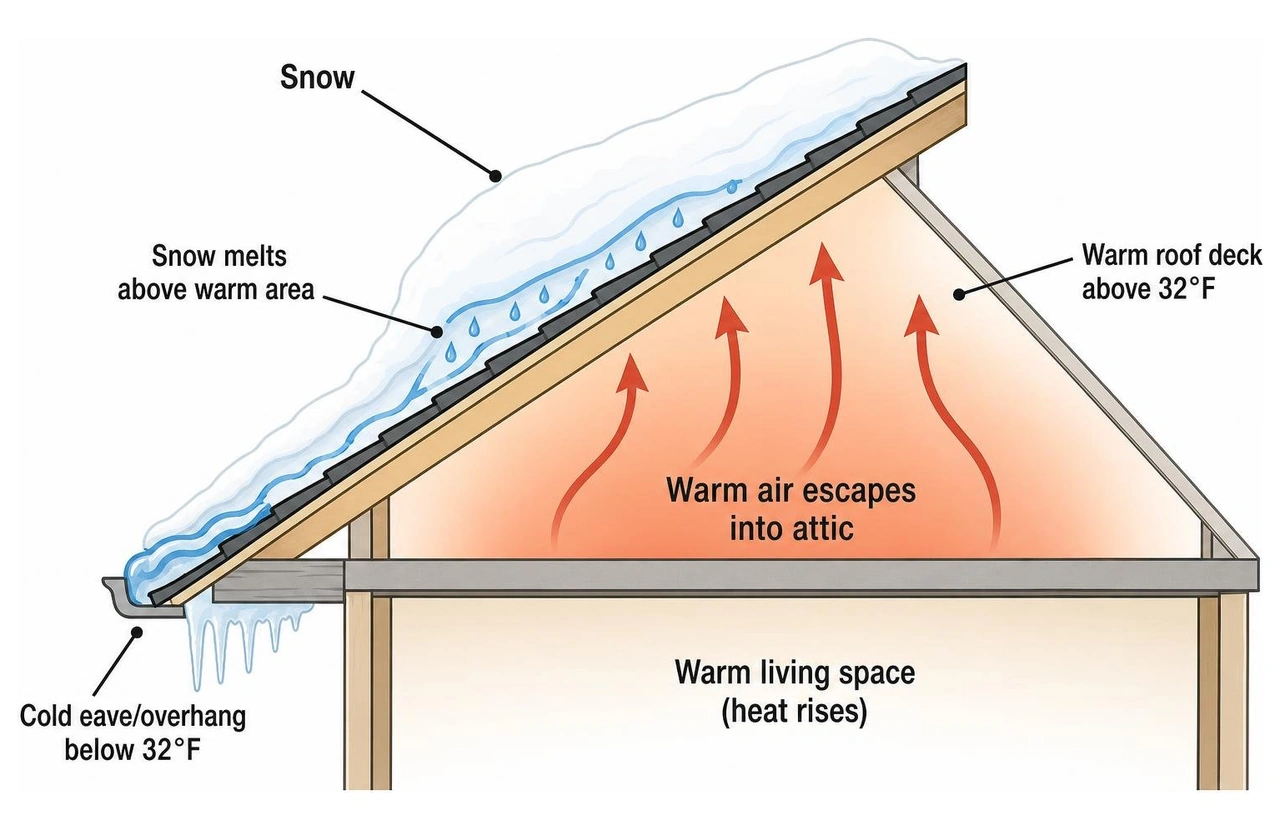
Why does this process target one specific spot winter after winter?
The answer comes down to attic heat distribution. Most attics are not uniformly warm across the entire space. Instead, they have distinct thermal "hot spots" caused by specific ceiling penetrations or structural quirks. When warm air leaks out at one precise spot, it heats the roof deck directly above that location every time your home heating runs.
This makes recurring ice dams function as a visual diagnostic map. The exact location where the ice ridge forms pinpoints where heat is escaping into your attic space from below.
Attic insulation plays a crucial role in maintaining balanced roof deck temperatures. In cold northern regions like Wisconsin and the Upper Peninsula, attics perform best with insulation levels between R-49 and R-60 (about 16 to 20 inches of insulation). Without proper air sealing and insulation depth, escaping heat easily warms the underside of your shingles. For more details on weather safety guidelines, see the resource on Preventing Roof Ice Dams - National Weather Service.
What Are the Most Common Localized Causes of Single-Spot Ice Dams?
Before looking at specific attic components, it helps to understand that localized heat leaks are among the most Common roofing problems we inspect in Northwoods homes. Here are the primary culprits that cause heat to concentrate in a single spot.
Unsealed Ceiling Air Bypasses
Ceiling air leaks (often called air bypasses) routinely account for 25% to 33% of a home's total winter heat loss. Because warm air rises naturally through stack effect, any unsealed opening between your heated living space and the unheated attic allows warm, moist air to stream straight up against the roof deck.
Common ceiling bypasses include:
- Recessed can lights (especially older non-IC rated fixtures that generate high heat)
- Plumbing vent stack penetrations
- Electrical wire openings and ceiling fan junction boxes
- Uninsulated or non-weatherstripped attic access hatches and pull-down stairs
A single unsealed recessed light fixture can release enough warm air to melt snow directly above it all winter long, forming a recurring ice dam right at the eave below that rafter bay.
Exhaust Vent and Duct Work Issues
Mechanical equipment running through the attic is another frequent cause of single-spot ice dams.
- Bathroom and kitchen exhaust fans that vent directly into the attic cavity or terminate too close to soffit intake vents
- Uninsulated or leaky HVAC ductwork running through unheated attic spaces
When an exhaust fan runs, it pushes warm, humid air into the attic. If the duct leaks or vents near the roof deck, that warm air creates a targeted hot spot on the shingles directly above it.
Architectural Roof Design and Valleys
Roof shape plays a significant role in where ice dams build up. Complex features like roof valleys, dormers, dead-end roof slopes, and low-pitch additions naturally catch heavy snow accumulation and gather meltwater runoff from multiple roof slopes.
In addition, structural thermal bridging often happens where exterior walls meet the roof line. At these wall intersections, insulation depth is frequently compressed or thin because space between the top wall plate and the roof deck is tight. This creates corner ice dams along exterior walls.
Solar Orientation and Sun Exposure
Not all hot spots originate inside the home. Sun exposure can create one-sided ice dams. South-facing roof slopes receive direct sunlight during winter days, causing snow to melt even when outdoor air temperatures remain well below freezing. As meltwater flows down toward heavily shaded northern eaves or gutter valleys that sit in shadows, the runoff refreezes quickly.
Why Doesn't Shoveling Snow or Chipping Ice Stop Them From Returning?
When an ice dam appears, many homeowners grab a roof rake or a hammer. While clearing snow off the lower eaves offers short-term relief, it does not solve the root cause.
Here is why surface quick-fixes fail over time:
- Snow raking removes raw material, not the heat source: Pulling snow off the lower roof edge stops immediate melting in that area, but as soon as the next snowfall arrives, escaping attic heat will melt it again.
- Clean gutters do not stop ice dams: A widespread myth is that clogged gutters cause ice dams. While clean gutters allow meltwater to drain freely when temperatures rise above freezing, ice dams regularly form on homes with clean gutters or no gutters at all. The dam forms on the roof deck above the overhang, not inside the gutter trough.
- Chipping ice damages shingles: Hitting ice dams with hammers, chisels, or hatchets often punctures asphalt shingles, cracks roof decking, and creates dangerous fall hazards on icy ladders.
- Electric heat cables are temporary band-aids: Heat cables melt narrow drainage channels through existing ice, but they consume electricity, can shorten shingle life, and do not address warm air escaping into your attic.
To read more about why snow removal alone falls short, see this detailed resource on Why Ice Dams Keep Coming Back - Even After You Remove the Snow.
Here is a quick comparison of temporary quick-fixes versus permanent thermal solutions:
| Solution Type | Action Taken | Pros | Cons / Drawbacks |
|---|---|---|---|
| Roof Raking | Pulling lower 4 to 6 feet of snow off eaves | Reduces immediate snow volume safely from the ground | Requires repetition after every snowfall; does not address heat loss |
| Heat Cables | Electric heating wires installed along roof edges | Helps maintain narrow meltwater drainage channels | Uses electricity; does not stop warm air escaping into the attic |
| Ice Chipping / Salt | Physical breaking or applying rock salt | Fast temporary ice removal | High risk of shingle damage, roof leaks, and fall injuries |
| Attic Air Sealing & Insulation | Sealing ceiling leaks and adding R-49+ insulation | Permanently stops heat loss and fixes localized hot spots | Requires attic work; usually completed with professional guidance |
How Do You Safely Diagnose and Permanently Fix Your Roof's Heat Leaks?
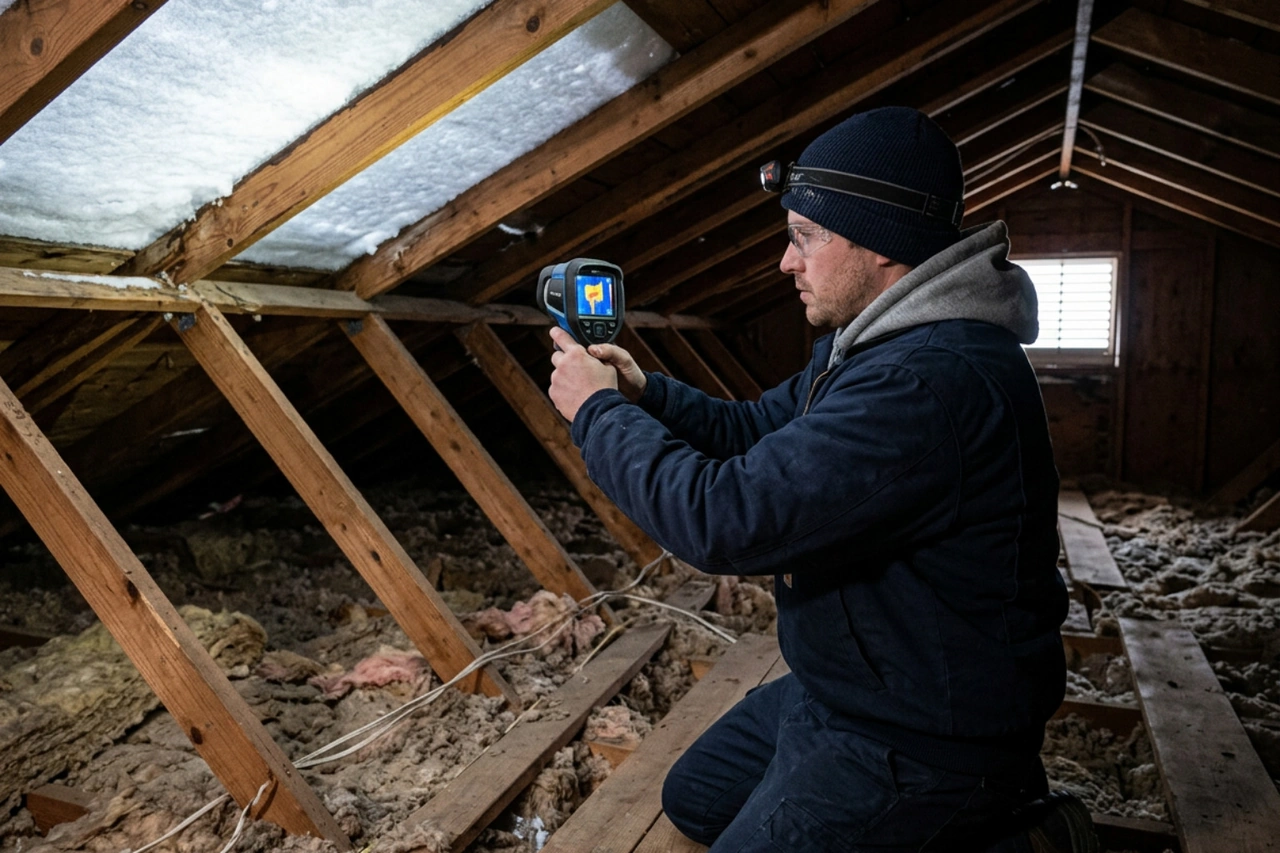
Fixing a recurring ice dam permanently requires working from the inside out. Instead of fighting ice on the roof deck, the focus must shift to resolving thermal leaks inside your attic.
Diagnostic Heat Leak Mapping
To pinpoint the exact spot where heat escapes, winter diagnostic mapping is helpful:
- Infrared Thermal Cameras: Thermal imaging scans performed during cold weather highlight warm spots on the roof deck and cold air drafts inside the attic.
- Visual Photography: Taking photos of your roof deck after light snowfalls helps create a map. The areas where snow melts first correspond directly to ceiling air leaks or thin insulation below.
The Step-by-Step Order of Permanent Attic Remediation
To resolve recurring ice dams, attic work should follow a specific order:
- Complete Air Sealing First: Before adding new insulation, seal all ceiling air leaks. Use expanding spray foam and high-grade caulk around recessed lights, plumbing stacks, electrical wires, wall top plates, and attic access hatches.
- Upgrade Attic Insulation Depth: Add blown-in insulation to reach R-49 to R-60 levels (16 to 20 inches) across the entire attic floor.
- Balance Attic Ventilation: Ensure continuous airflow from soffit intake vents to ridge exhaust vents using rafter baffles (chutes). Baffles keep blown insulation from blocking soffit vents, helping keep the roof deck cold.
Primary ceiling air leak locations to seal first:
- Uninsulated attic hatches and pull-down stairs
- Recessed can light housings
- Plumbing vent pipe penetrations
- Electrical wire openings above interior walls
- Bathroom and kitchen exhaust fan housings
Roofing Membrane Protection and Replacement Upgrades
When it is time for a full roof replacement, exterior details provide a vital backup layer of protection against meltwater backup. To learn more about cold-climate roofing choices, read our guide on What is the recommended roof for snow and ice dams in Wisconsin.
Self-adhering Ice and Water Shield membrane is a waterproof underlayment applied directly to the roof deck along eaves, valleys, and around penetrations. In northern climates, we usually recommend extending this membrane at least 24 inches past the interior warm wall line (and up to 3 to 6 feet in high-risk zones). While Ice and Water Shield does not stop ice from forming, it acts as a tough seal around roofing fasteners to keep backed-up water from leaking into your home.
Before replacing a roof, review our complete Roof inspection checklist to evaluate your roof deck and ventilation needs.
At Eagle River Roofing, our team is locally owned and was founded in late 2023, built on a 50+ year legacy of local experience in Northwoods roofing. We have installed over 9,000 roofs and 8 million feet of gutters across Eagle River, Rhinelander, Minocqua, St. Germain, Three Lakes, and nearby communities. As a GAF Master Elite contractor, we specialize in high-performance GAF shingle systems designed for heavy snow loads, as well as standing seam metal roofing. For residential shingle replacements, we exclusively install GAF shingles because of their proven wind and weather resistance in northern climates.
If you are dealing with active leaks or roof damage from ice, check out our Eagle River Roofing repair services to see how we can help.
What Are the Most Frequently Asked Questions About Recurring Ice Dams?
Can clogged gutters cause an ice dam to form in the exact same location every year?
No, clogged gutters do not cause ice dams by themselves. While trapped debris in gutters can hold ice and create large icicles, ice dams form because heat escaping from the home warms the upper roof deck while the lower roof edge stays freezing cold. Ice dams frequently happen on homes with clean gutters or no gutters at all if there are unsealed air leaks in the attic.
Does getting a brand-new roof replacement automatically solve recurring ice dams?
No, getting a new roof replacement will not automatically stop ice dams if the underlying attic heat leaks remain unaddressed. A new roof adds waterproof Ice and Water Shield underlayment, which can help prevent interior water leaks during a melt, but new shingles alone will not stop snow from melting if warm attic air continues to heat the roof deck from below.
How much insulation do I need in my attic to stop ice dams in northern climates?
In cold northern regions like Northern Wisconsin and the Upper Peninsula, attics perform best with insulation levels between R-49 and R-60. This typically equals about 16 to 20 inches of blown fiberglass or cellulose insulation, paired with thorough air sealing of all ceiling penetrations and clear soffit-to-ridge ventilation.
What Is the Most Effective Way to Protect Your Home Moving Forward?
Recurring ice dams in the exact same spot are a clear indicator of a localized thermal leak inside your attic system. By understanding that ice dams are an attic heat issue rather than an external weather anomaly, you can take practical steps to protect your home.
Remember the ideal sequence for long-term protection:
- Seal attic air leaks around lights, vents, pipes, and hatches.
- Upgrade attic insulation to R-49 or R-60 depth.
- Maintain balanced soffit-to-ridge ventilation with clear rafter baffles.
- Install high-quality GAF shingle systems with Ice and Water Shield membrane during roof replacement.
If you are tired of dealing with recurring ice dams every winter in Eagle River, Rhinelander, Minocqua, or surrounding Northwoods areas, our team is here to guide you with clear written quotes and tidy job sites. You can get started today by requesting an Eagle River Roofing instant estimate to schedule a no-pressure assessment of your roof.
This article is for general informational purposes only and may not reflect the most current products, pricing, codes, availability, weather-related recommendations, or roofing requirements for your specific property. Every home and roof is different, especially in the Northwoods. Please contact Eagle River Roofing directly for the latest information and guidance for your project.

